A technique for the construction and assembly of metallic, see-through eye lenses for the 2018, 2019, and 2020 Maratus volans heads, which may be of use for other costumers.
Published
Updated
The following page describes the development process for the technique, as well as the technique itself, of creating convex lenses with a shiny surface that can be seen through. The resulting lenses are suited for use in insect or arthropod fursuits, or scifi vizors, or other shiny curved shapes.
The evolution of lens design
This photo by Jurgen Otto shows the details of the Maratus volans face. Note the shape of the pedipalps and the coloration of the eyes.
Eyes are perhaps the most materially difficult part of any costume, especially when you want to be able to see through the eyes. Note the metallic green sheen of the eye surface in the above photo.
In 2018, I bought a pair of oversized dark-brown sunglasses and cut up the lenses to make the eyes. It was adequate, yet nowhere near as accurate as I’d like.
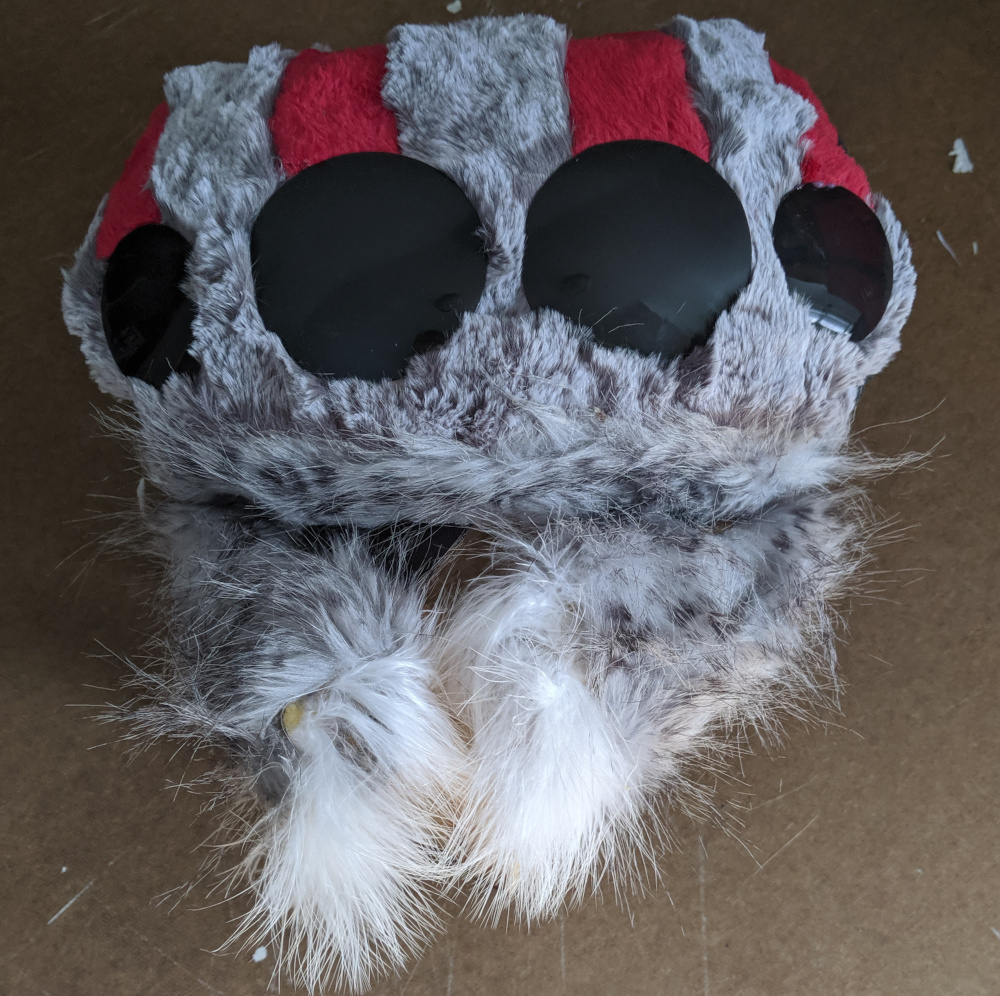
The 2018 head.
So for 2019, I aimed for something much more ambitious.
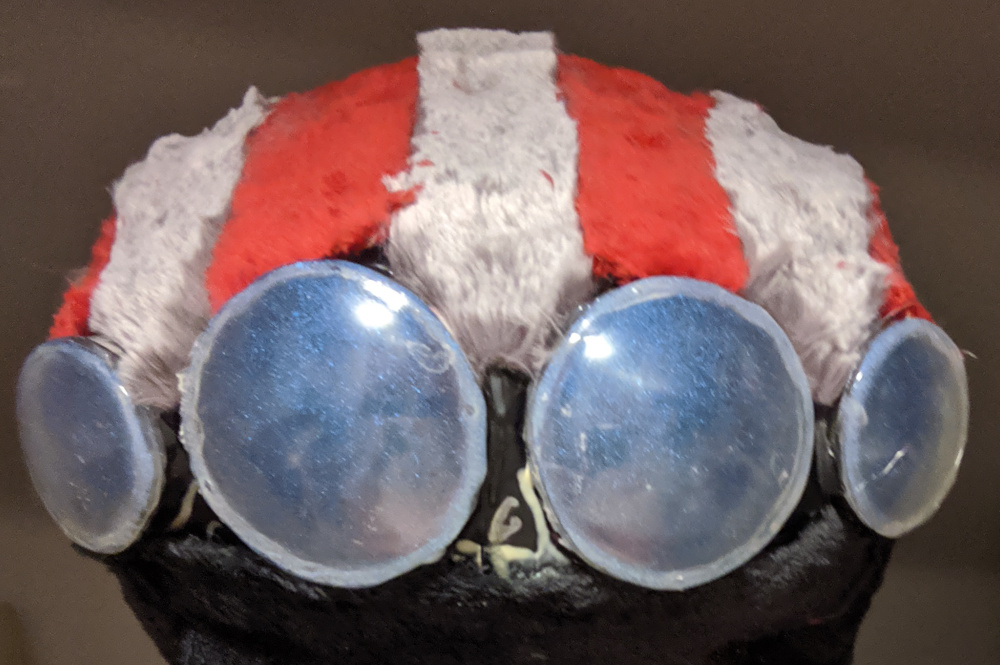
This is the final end product of the 2019 eye-creation process. Note the metallic sheen as well as the apparent translucence.
This technique combines curved lenses with a metallic spraypaint. The spraypaint has a uneven surface, which blurs incoming light greatly. The multiple layers of paint required to get the translucent surface shown here are also quite soft, making it easy to accidentally smear or wipe off the paint. However, the lenses had a delicious curvature from a technique which I continue to use.
The next evolution in lens design was to purchase a translucent metallic acrylic sheet, and affix it to the plexiglass substrate using cyanoacrylate glue before shaping the lens.
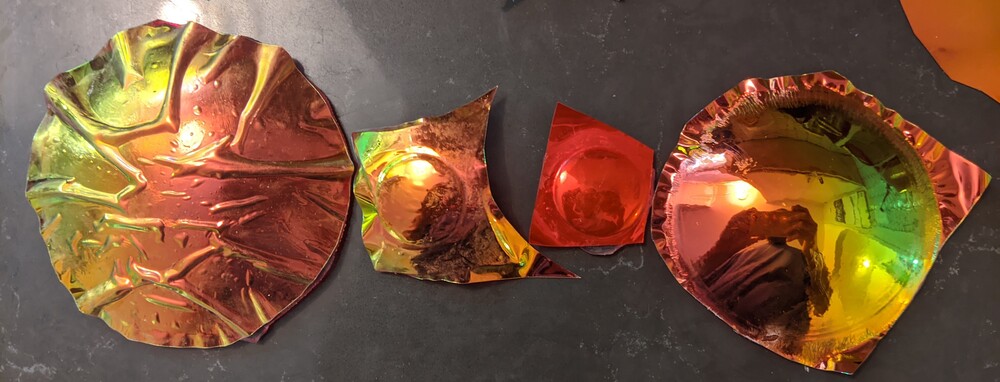
On the left, lenses which were shaped before the metallic acrylic film was applied to the lens. On the right, lenses where the film was glued to the flat blank before the lens was heated and shaped.
The 2020 technique is the one I shall continue with in the future: cut a plexiglass blank to size, slather it in cyanoacrylate superglue, apply the acrylic face film, squeeze the bubbles out, wait for the superglue to cure, toast the sandwich, and shape.
List of materials, tools, and other requisites
Early in the process of building the 2018 skull, I popped over to the local Ace (the helpful place!) Hardware to ask what ideas they had about making the eyes. I got a cast-off sheet of 1/8th-inch plexiglass, and started experimenting with what would be necessary to shape it as needed.
Over the course of shaping the eyes, I used the following tools to cut and trim the plexiglass:
A marker that can write on cheap plastic film, such as a Sharpie permanent marker.
A fine-toothed coping saw.
Safety goggles (in case of flying plexiglass shards).
A facemask to deter sawdust, such as any spare close-fitting masks (N95s or KN95s are great) you may have from protests, wildfires, or pandemics.
A metal file, with work gloves (leather) and earplugs.
A vacuum cleaner, hoover, shop vac or similar.
A well-ventilated workspace such as a porch, balcony, step, stoop, loading dock, garage, or parking spot, with a surface that can hold and support materials being sawed, such as a workbench or a thin towel laid on a solid building ledge.
A first-aid kit with wound cleaners such as alcohol wipes, and wound dressings such as antibiotic ointment and band-aids.
For bending the plexiglass, I used an electric toaster oven heated to about 375F/190C, a 2” glass sphere paperweight, and for support, a metal jar lid or a small ceramic tea bowl. I hammered the center of the lid out some so it was further from the rim, so that the plexiglass had more space to move when being pressed onto the sphere by the lid’s rim.
You will need these materials to assemble the lens blanks:
A sheet of plexiglass between 1/8 and 1/16 inch thick. Make sure you’re getting real polymethyl methacrylate (PMMA) plexiglass, which is often sold under the Plexiglas, Lucite and Perspex brand names.
Copious quantities of superglue: maybe 1mL per nine square inches of lens, at the rate of about 8 tiny metal squeeze tubes for a total of three large lenses, six medium and four small. Make sure you’re getting cyanoacrylate; it’s chemically similar to the plexiglass and has a slightly lower melting temperature.
Metallic acrylic sheets, of the sort that come in a 12-color variety pack for a song on Amazon. Grab a variety pack and use the color you don’t like to practice your glue and heat-and-curve technique.
Waxed paper, to keep your work surface free of superglue, and your shiny acrylic sheet clean.
Disposable nitrile or latex gloves, to keep your hands free of superglue.
A well-ventilated area to apply the superglue and allow it to cure for 8-12 hours, such as a covered porch, a bathroom with an extractor fan, a kitchen with an exhaust fan, or a low-traffic room with a window propped open by a box fan aimed out the window. This project is best conducted in temperatures above the minimum curing temperature of your superglue.
(optional) small weights to keep the acrylic from blowing away in the breeze while it cures.
You will need the following to heat and shape the plexiglass:
An electric oven with adjustable thermostat
Heat-resistant gloves that allow you good dexterity. Fire gloves, welding gloves, insulated real-leather winter gloves, or cheap leather work gloves layered over cheap knit gloves are acceptable options here; your gloves must be heat-resistant enough to hold onto hot items direct from the oven for more than a few seconds. Hot materials are hot! Make sure you know how to turn off the oven in case of a fire!
A work surface sufficient for hot items, such as a metal, synthetic stone, or real stone countertop, or metal stovetop.
A fire extinguisher, because every workspace needs one, but especially one where we’re heating flammable materials to high temperatures.
A well-ventilated area such as a kitchen with an exhaust fan, a well-ventilated garage, or an outdoor patio. If you are using a garage, make sure that any flammable items (paints, solvents, gasoline, petrol, welding gases, rags, newspaper) are stored well away from your workspace. Do not use a space near a building’s air intake.
A concave tool and a convex tool, both heat-resistant. My convex tool was a glass sphere paperweight. My concave tools were a 1-inch-long piece of 1-inch-diameter metal pipe, a 2.5-inch-diameter ceramic tea bowl, and the 4-inch-diameter metal lid from a jar of salsa.
⚠ General handling and safety tips:
Do not inhale the fumes or dusts produced by cutting plexiglass. Work with it outdoors or in a well-ventilated workspace. These fumes and dusts will fuck up your lungs.
Do not inhale the fumes or dusts produced by curing superglue. Work with it outdoors or in a well-ventilated workspace. These fumes and dusts will fuck up your lungs and mucus membranes.
Do not inhale the fumes produced by heating the combined lens assembly. Work with it outdoors or in a well-ventilated workspace, and maintain ventilation until all hot parts are cool. These fumes will fuck up your lungs and mucus membranes.
Avoid touching plexiglass surfaces with bare fingers, except by the edges. Your fingers will leave oils, and superglue will emit vapors which will settle upon and highlight these oils. This is a common method that police use to find fingerprints. The visible fingerprints will make it harder to see out of the lenses.
Avoid removing protective films from the plexiglass blanks and the acrylic sheets until instructed to. This will help keep them free of scratches, fingerprints, and other contamination.
Read the safety instructions materials safety data sheets (MSDS) for your glue, and for other ingredients as available. Read the instructions manuals for your tools and appliances. Make sure you know how to use them.
⚠ This is not a complete list of all safety precautions that you will need to take. You know your workplace and environment, and what precautions may be needed to keep pets, small children, and other meddlers from encountering this project while it is in progress. I’m just a person on the Internet giving you safety advice; do you actually trust me? You are the responsible party if your lungs dissolve or fill with plexiglass shavings, if you cut your thumb off, if you set fire to the apartment building, if your landlady sits down on the wrong bench and gets your lenses superglued to her best Sunday dress, or if anything else happens. Think about what could go wrong, and have countermeasures.
The process
This is a process which will take, at minimum, a whole day. Figure 2 hours for cutting the plexiglass (once you know what size you need), 8 to 12 hours for the glue to cure, and an additional 2 to 4 hours to shape the lenses and allow them to cool.
Cutting the lens blanks
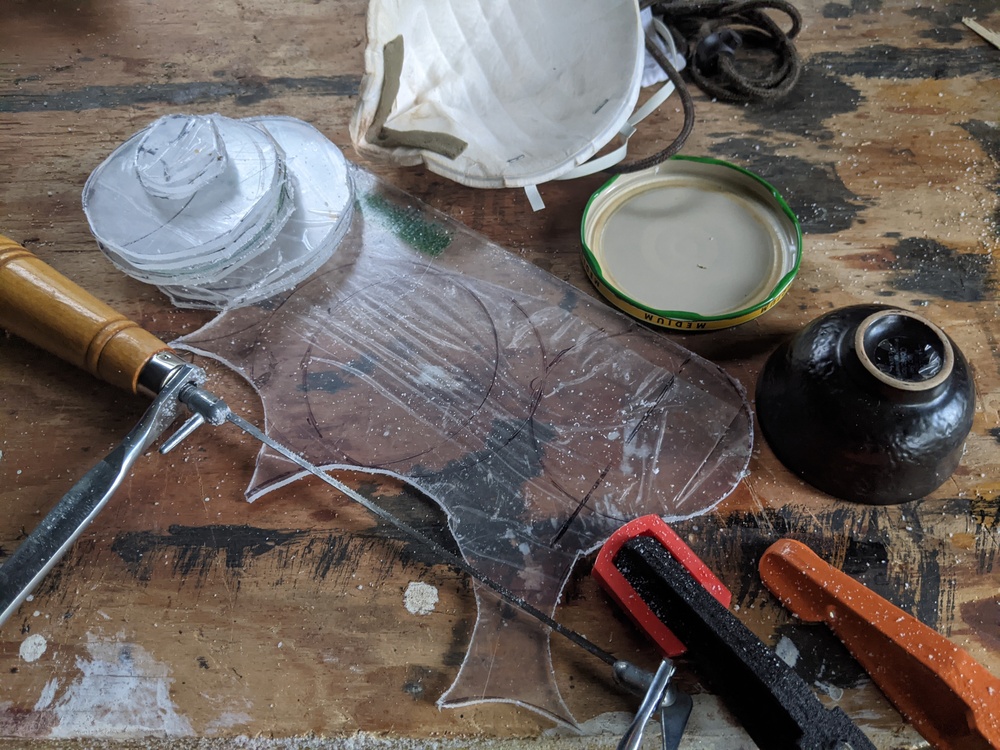
Here can be seen the original plexiglass sheet with its protective plastic film intact, the circles drawn upon it, the bowl and jar lid used to trace the circles, the saw used to cut the circles, the cut circles, the clamps used to hold the plexiglass sheet while it was cut, and an N95 mask used to protect my lungs from the sawdust.
Cut out the lenses:
Trace circles onto the protective film on the plexiglass. The 4” salsa jar lid I will use to bend the hot lenses is a great size for the large lenses in this Maratus volans head.
Cut the circles out with a fine-toothed coping saw. Cut carefully so that the cut shape is as close to the desired final shape as possible. The saw is the easiest way to shape the plexiglass.
Do this in a place with adequate ventilation and air filtration, as the fumes emitted by friction-heated plexiglass are unpleasant. Wood sawdust clings via physical means; plexiglass sawdust will also cling via static-electricity attraction.
You’ll also need to support the plexiglass while sawing it. If you’re cutting on the edge of a table or bench, keep the saw blade as close to the bench edge as safely possible, to avoid putting stresses on the plexiglass that may cause it to snap. Clamp the plexiglass to the surface, if possible, to reduce wiggle and noise.
After cutting each out, clean up the edges with sandpaper or a file. If you’re using a metal file, you may want to use ear plugs or other hearing protection. Try to keep the protective plastic sheeting on the lenses.
Make the lenses metallically shiny
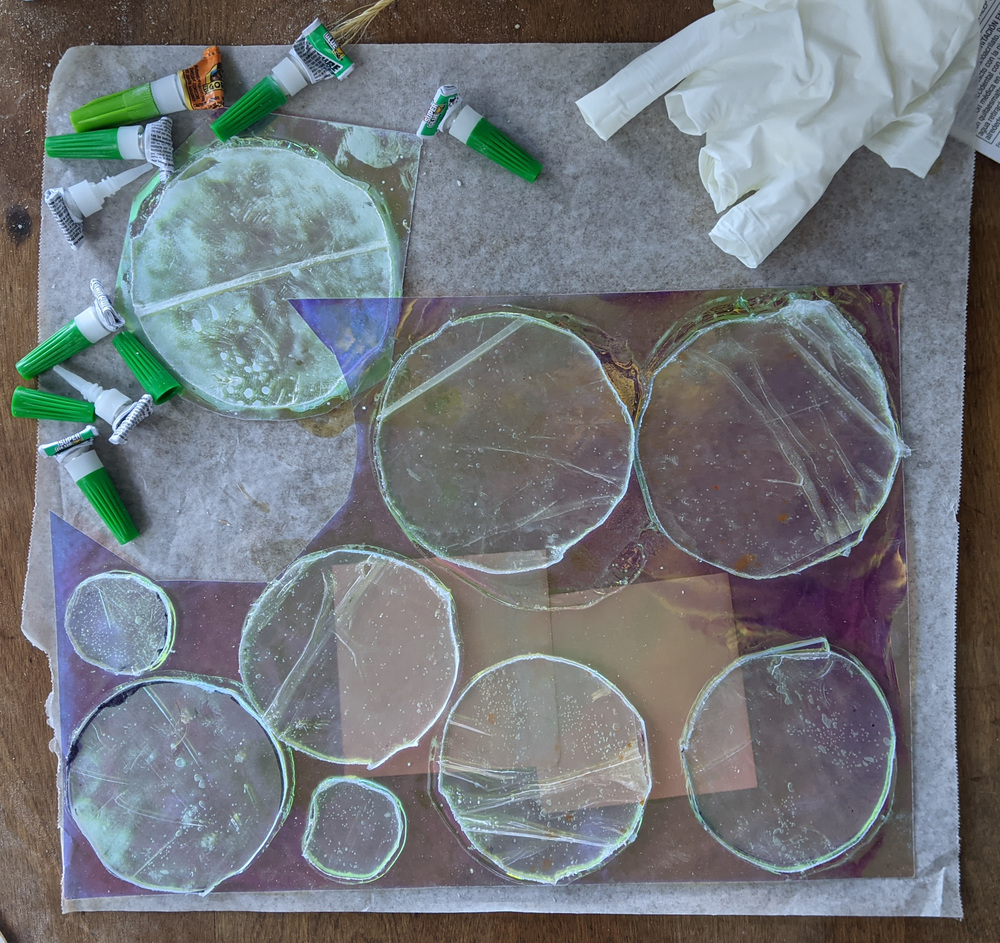
This is the end state of the gluing process: a sheet of shiny acrylic, with plexiglass disks glued to it, sitting on a sheet of waxed paper on a workbench while the glue cures. The glove was turned inside out by being removed; the superglue tubes are spent. I advise you to wait until the glue cures to begin cutting out the circles.
Affix the colored acrylic to the lens blanks:
Blow your nose, scratch your face, and do whatever else needs to be done with your hands.
If you are not doing this outside, turn on your fume hood or extraction/exhaust fan.
Don your disposable gloves.
Remove the protective backing from the non-metallic side of the metallic acrylic sheet, and place the sheet on your work surface with the exposed side up.
Arrange your blank lenses on the acrylic sheet so that you’ll be sure they all fit.
Work one lens at a time.
Remove the protective film from the front side of the plexiglass blank.
Coat the exposed front of the plexiglass blank with a thin, uniform coat of cyanoacrylate superglue.
Lay the lens down on the acrylic sheet, one edge first, then lowering it fully and squishing any bubbles out.
Repeat until all lens blanks are glued to the sheet. Do not remove the remaining protective film from the lenses.
Let the glue cure overnight in a well-ventilated space such as a screen porch or a room with a running exhaust fan such as a bathroom or kitchen.
Eight to 12 hours later, you should expect to see white deposits on the acrylic film between the lenses, on the edges of the lenses, and on the protective film on the backs of the lenses.
Cut the lenses apart, and trim down the acrylic edges.
Toast the lens blanks and shape them
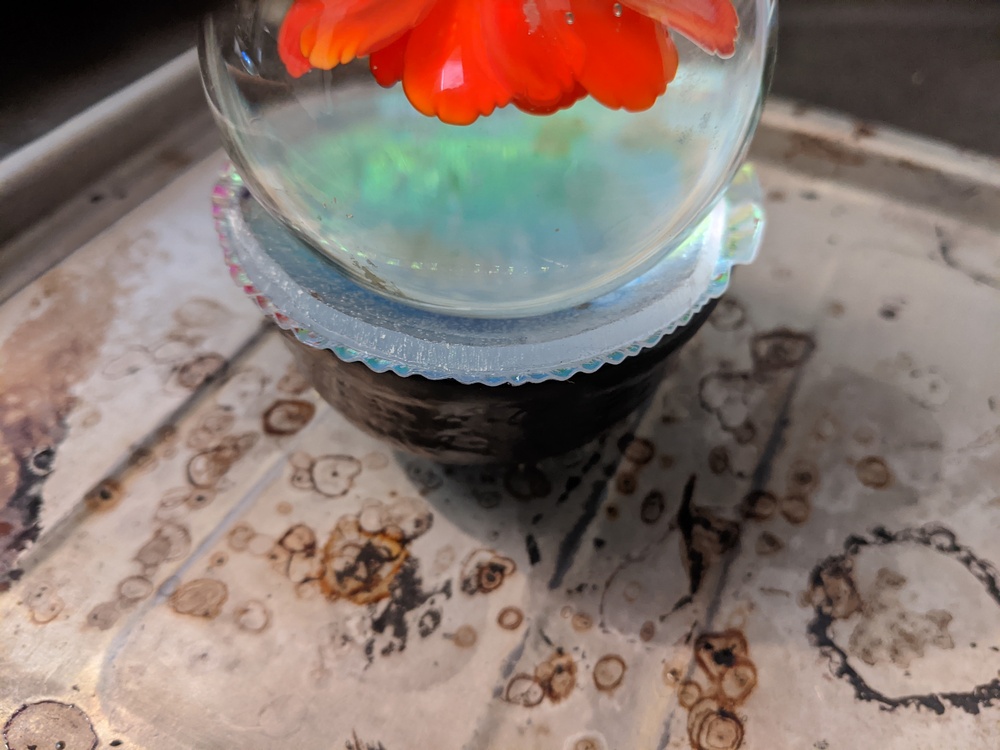
Here I press the glass sphere (a paperweight of a flower) down onto a lens blank, forcing it into a small ceramic bowl. The rim of the bowl supports the lens; the sphere presses the lens into the bowl. This stretches the lens into a convex shape. The acrylic sheet will wrinkle around the edges as it stretches; this can be trimmed off later. Note that the bowl sits in the heating tray of my toaster oven; I have yanked the whole stack straight from the high-temperature oven in order to shape the lens while it is still hot.
Heat and curve the lenses:
Remove the protective film from a lens. Place the cut-out plexiglass circle atop the jar lid, with the glass sphere on top of the plexiglass. It may help to think of the sphere and lid as a hammer and anvil, or opposite sides of a press. The jar lid’s rim presses around the edge of the plexiglass circle, while the sphere presses in the center.
Put the sphere-plexiglass-lid stack in the toaster oven, and heat to about 375F/190C.
Watch the plexiglass carefully for signs of bubbling. Boiling the plexiglass will make it very difficult to see through. If you see bubbles, pull the stack from the oven to let it cool a bit while you reduce the heat in the oven a little bit. Bubbles first appear around the edges.
When you pull the stack from the oven, press the plexiglass down into the jar lid, tea bowl, glass sphere, piece of pipe, or other shaping aid. You can do this by hand with your gloves, but it’s harder to get a uniform shape.
If necessary, repeat steps 3-6 until the plexiglass is adequately curved.
If necessary, trim the plexiglass while it’s hot with tin snips or metal shears. You’ll want to use a tool that gives you good leverage and is manipulable by your gloved hands. And unless you’re keeping the shears in the oven with the plexiglass, your shears will be cooler than the plexiglass, and will suck the heat from the plexiglass quickly. This isn’t a bad thing, but it’s why I didn’t use the shears for big cuts: the plexiglass isn’t easily cut when it’s colder than about 300F/150C.
When the plexiglass has cooled, finish off any rough edges with a rasp or file meant for hard materials. I have a lovely metal file, normally used for sharpening axes, which was adequate for this purpose. You will probably want work gloves for this step. If the plexiglass shrieks upon the file, you’ll want earplugs to help protect your hearing.
Repeat the steps above as necessary, until you have enough lenses. For the two small eyes, four medium eyes, and two large eyes of this Maratus volans head, I cut about 5 large lenses, five medium lenses, and three small eyes. While developing this process, I lost two large lenses and four medium lenses to bubbling.
Once your lenses have cooled, you can use metal shears or a file to carefully remove extra material.
When you have the lenses done, affix them to cardboard or paper tubes of the appropriate diameter. Place the lens on a surface, hold the tube on it from above, and apply hot glue to the joint from the outside of the tube.
Notes for adapting this technique to other designs
You may wish to experiment with shapes other than a circle, or more than one point of pressure in the deformation. That should work.
I affix the lens to a cardboard tube for ease of mounting, and because it lets me rotate the lens to get the best appearance. You could experiment with mounting the lenses directly.
If you will be looking through the lens, paint the inside surfaces of the tube (and the inside of your mask or helmet or skull) a matte black, to reduce internal reflections and eye strain. To coat the inside of smaller tubes, blow black spray paint through the tube, but not so much that the spray paint drips.